減肥.塑身現在是非常熱門的活動
當褲頭漸漸的鬆了.是不是成就感十足呢
但是接下來的問題可能是:很多褲子都要掉下來了.....
當然重買件新的是愉快的事
若是對於已經產生感情.或是處於減肥尷尬期時.修改一下褲頭就是有必要的
來看看在My Craft Discovery這個部落格教我們的方法
那就是在褲頭加入鬆緊帶.這個方法在小朋友的褲子上也可以看到.所以大家要趕緊學起來~~
在這裡簡述一下作法:
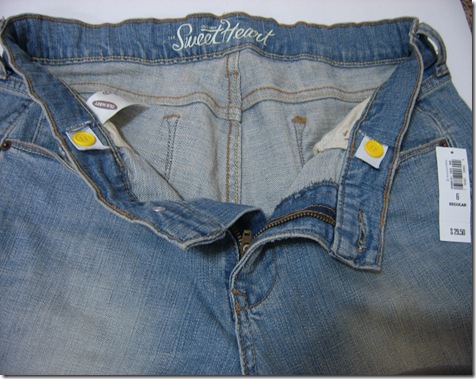
在牛仔褲頭的腰部兩側開個小孔.各縫上一顆釦子
未免孔開得太大.請使用*拆線刀*來開洞
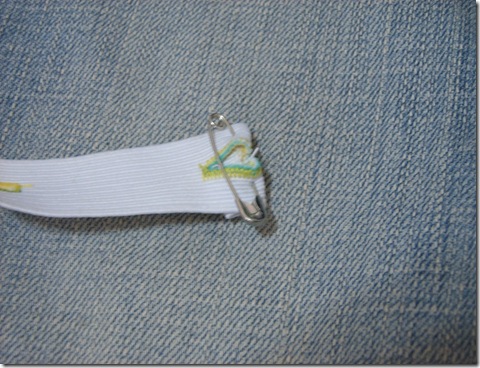
取適合長度的寬版鬆緊帶.兩前端車出幾個鈕扣孔
把鬆緊帶一頭別上安全別針穿進開好洞的褲頭裡.兩頭扣上鈕釦.
現在你的褲頭就變成可以調整的褲頭囉~~
How to Make an Adjustable Waistband the Easy Way
I have been searching for the perfect light wash jeans for about a year now. I never really found any. So I made something work, like I’ve learned to do recently. I used this technique to fix all 5 of my professional dress pants that I got from target.
Some pants can be altered this way, and some can’t. Here’s how to figure it out. Take your fingers and try to pull apart the two layers of fabric that form your waistband on your pants. If they can pull apart around the whole waistband, then you can use this technique. If not, check out this tutorial for an alternative route.

You’ll need:
Pants
elastic (I use woven, and make sure it’s thinner than your waistband)
Buttons
Needle and Thread
Safety Pin
First, mark where you want your buttons to be on the inside of your pants. I usually put them where a belt loop is on the outside of the pants so your stitches to hold your button don’t show. (Do this on both sides of your pants, I just pictured one side.)
Then lay your elastic on the inside of your pants, and cut it to size matching it up with your button marks.
Now we’ll mark where we want our buttonholes. I did the first hole 1/2 inch from the edge, and then spaced the other two holes 1 1/2 inches apart. I only do three holes, but you can do more if you’d like.
Make button holes on both ends of the elastic piece. A little nervous about making button holes? Check out this tutorial from Dana @ Made. She makes it easy.
Sew both buttons on over your button marks. I start the knot on the inside of the pants, and also end the knot of the inside to make it as invisible as possible. I used yellow thread here, but you could use something that actually matches your pants.
Then take your seam ripper and make a slit to form a casing in your waistband. The hole should be on the back side of the button. You don’t want your hole closer to the zipper side. (That was really hard to explain! Let me know if you have questions. The next pictures may help too.)
Now take one end of your elastic, roll it up so it makes it kind of bulky, and pin it. Then thread your elastic through your casing. When you get close to the end, make sure to button your elastic to your pants so your don’t lose the other end of your elastic inside the pants!
Here’s an inside view of them all done. I usually wear my pants set to the second button. As they wear and get washed, I usually can put it back at the first. The waistband looks a little scrunchy when you’re not wearing them, but once they are on they look smooth. Super simple, and now you won’t have falling-off pants!
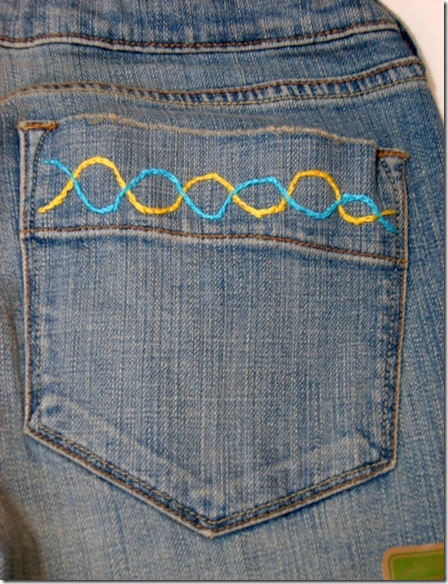
And while we’re on the subject of jeans, I’ll show you what I did to these boring pockets! Embroidery thread fun stitch, and that’s what I came up with. I searched for a tutorial for you, but I couldn’t find it’s “generation,” correct stitch. If you want to know how, let me know and I’ll make a quick tutorial.
Hope you’re having a fabulous day!
~Lynette~


 留言列表
留言列表
 手作圈..
手作圈.. 
 {{ article.title }}